In this blog post, we will look at Nvidia’s Rapids Accelerator for Apache Spark, a plugin for distributed data processing on the GPU. You will learn, how to set it up on Azure Databricks and run a toy example.
In the last two decades, we have witnessed the rise of big data and data science. Data is getting bigger and transformations are becoming more complex while CPU processing power is reaching its limits. Due to their high parallelism and bandwidth, GPUs are getting more and more adopted in high-performance computing and data science to keep up with the ever-growing demand for computing power.
Apache Spark is currently the de-facto standard framework for building distributed data processing pipelines for big data. Nvidia recently released and open-sourced the “Rapids Accelerator for Apache Spark“, a plugin to accelerate Spark applications on the GPU. This is done completely transparent, i.e. the user defines his Spark data frames or SQL queries as on regular (CPU) Spark and the plugin performs the respective operations on the GPU or falls back to the CPU if an operation is not supported.
In this series of blog posts, we will get to know and evaluate the Rapids Accelerator . This first blog post will be about:
- Setting up Azure Databricks as our Spark hosting service, running a Spark job and understanding the associated costs
- Setting up the plugin on Databricks and running a toy example
- Some runtime measurements with varying degrees of parallelization on a demo provided by Nvidia
The plugin is currently under active development with stable releases about every two months. This post is based on Spark-Rapids v.21.06.2. A basic familiarity with regular (CPU) Spark will be assumed.
Setting up the Environment
Nvidia provides a documentation page for the plugin.
It is the most comprehensive source of information for the plugin currently available. The “Getting Started“ page describes how to set up the plugin on every major cloud Spark service as well as a Kubernetes and an on-premise setup. Note that the usage of the associated cloud services even for demo purposes is not free of charge. Currently supported GPU families are the HPC data center GPUs Nvidia T4, V100 and the new A-Series (A2, A10, A30, A100).
Let’s set up the plugin on Databricks since it is one of the easiest options to get started. We will walk through a complete example in Azure, however, Databricks is also available on AWS or GCP. If you already have access to Databricks, e.g. via your company, feel free to move on to Section “Quick Tour Through Databricks“. If you want to set up the plugin in another service, follow the instructions on Nvidia’s documentation page and continue reading at Section “Running a Demo“.
Note: I would recommend setting everything up with Azure as an institutional client instead of a private individual. We will need Virtual Machines with GPUs that are in high demand at the time of writing. The chances are higher that Azure may approve the required VM core quota (Section “Adjusting Azure VM core quota“ below) if you are an institutional client.
Setting up Databricks on Azure
The official quick start guide on setting up a Databricks Workspace and running a Spark Job can be found here.
Create an Account and a Subscription
A valid Microsoft account with an Azure “Pay-As-You-Go“ subscription will be required. Head to Azure Portal and create an account or use an existing Github or Microsoft account.

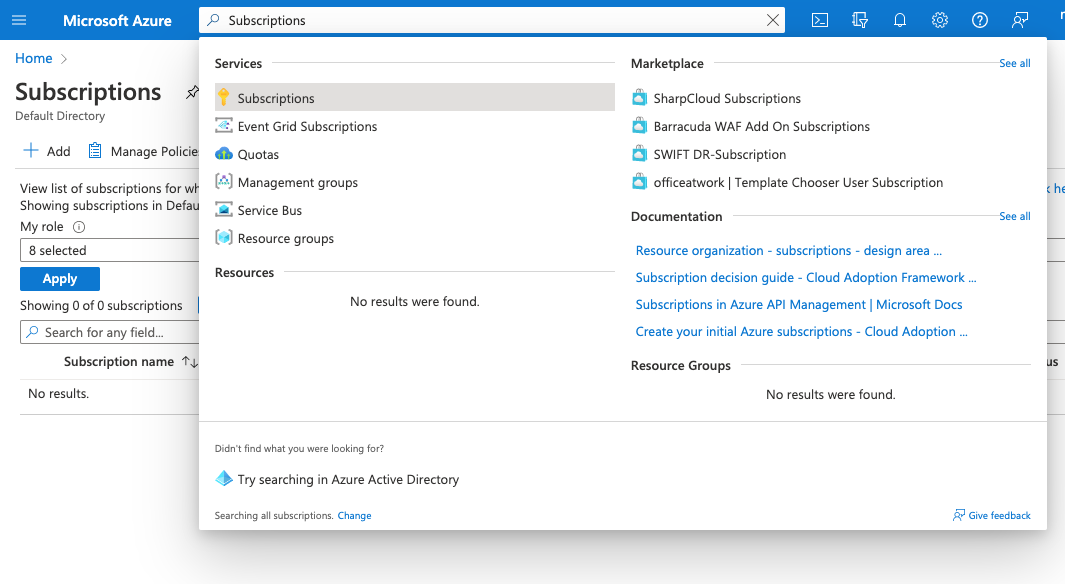
If you do not have an Azure “Pay-As-You-Go“ subscription (e.g. through your company), create one. Search for “Subscriptions“, click “Add“, select “Pay-As-You-Go“, enter a „Subscription name“, click „Review + create“ -> „Create“ and follow the instructions. Note that after providing credit card information, you will be asked which Azure Support Plan with monthly charges you want to choose. Select the option without the support and monthly charges. You will only be charged for the computing resources (VMs) actively used by Databricks and for some storage and virtual network. In Section “Understanding available Azure Databricks VMs and Pricing“ you will learn more about pricing.

Create a Resource Group
Now you need to create a resource group, a container to couple Azure resources.
Search for “Resource groups“, click “Create“, provide a resource group name and select the respective subscription as well as a region of your choice. Note that not all regions support the GPU accelerated VMs. To be on the safe side, choose a major region such as “West Europe“. Select “Review + create“ and “Create“ after validation completes.

Create a Databricks Workspace
Now you can create a Databricks Workspace, which is the web app to interact with Databricks. Search for “Databricks“, select “Create“, select the respective subscription and resource group, provide a name for the workspace, select the same region as in your resource group and “Standard“ Pricing Tier. You may also choose “Trial“ to not incur the cost for the Databricks Service for 14 days. You will however still pay for the Azure compute resources and the storage! Check out the Databricks pricing page for more information on Databricks pricing. Click on “Review + create“ and on “Create“ after validating.

It will take a couple of minutes until the workspace is created.

Adjusting Azure VM core quota
Azure limits how many VMs can be deployed in parallel using a CPU core quota. You need to make sure that your quota is high enough and adjust it if necessary. Note that you might not have the proper privileges to increase the core quota, which is usually the case in corporate settings. In this case, you must contact your company’s Azure administrator.
Azure limits the quota per region and per VM family. Thus, you need to increase both.
Search for “Subscriptions“ and select your respective subscription. In the left panel select “Usage + quotas“. Filter for your region e.g. “West Europe“, set the provider to “Microsoft. Compute“ and search for “Total Regional vCPUs“.
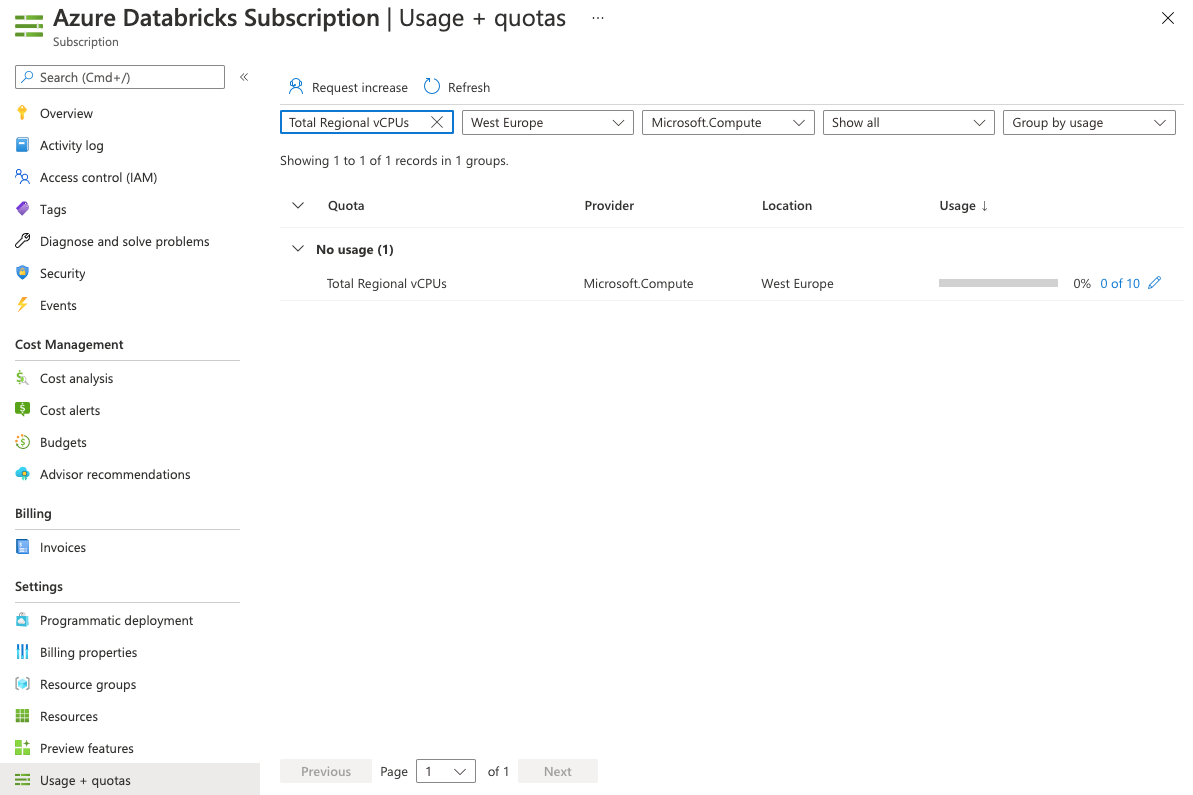
Click on the pencil and set a quota higher than 48 to comfortably follow this article. It may take a couple of minutes until the quota increase is approved.
Search and increase the core quota for following families:
- “Standard DASv4 Family vCPUs“ to at least 16
- “Standard NCASv3_T4 Family vCPUs“ (T4 GPU VMs) to at least 32
- “Standard NCSv3 Family vCPUs“ (V100 GPU VMs) to at least 12
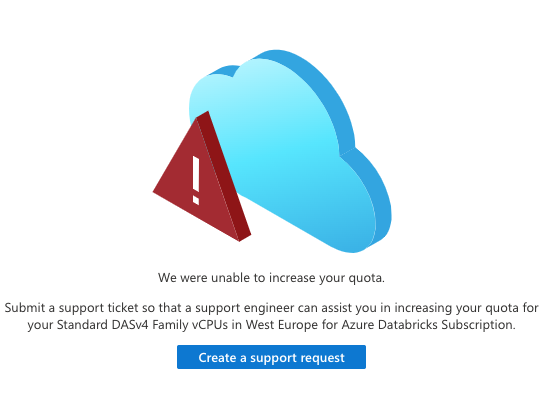
Note, if the quota cannot be increased automatically, you will be prompted to open a support ticket with Azure, so a Support Engineer will take care of it. In this case, just click on „Create a support request“ and follow the instructions. It is possible that the quota request may not get approved at that moment due to high demand. This may especially happen if you are not an institutional client.
For more information on increasing quotas please refer to respective Azure documentation.
You can come back later and increase the quota even further and add additional VM families supported in Databricks.
Launching the Databricks Workspace
When the quota increase is approved and the workspace deployment is completed you can search again for “Databricks“, select the workspace just created and click on “Launch Workspace“.
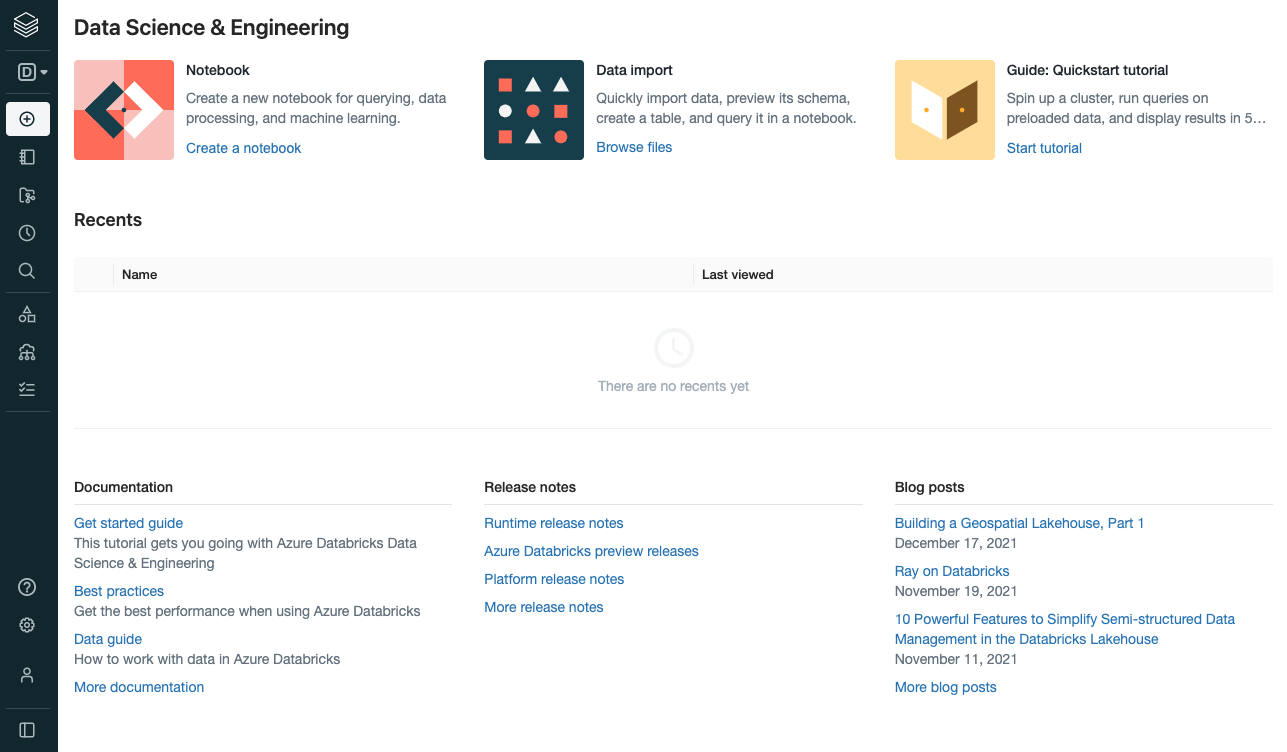
Quick Tour Through Databricks
This is the Workspaces main page.
Running Spark Jobs
On the left navigation bar, you can select “Compute“ and then “Create Cluster“ to create an “All-Purpose Cluster“. An “All-Purpose Cluster“ is a cluster that can be used interactively with Databricks Notebooks (similar to Jupyter Notebooks).
On the “Create Cluster“ page you can configure the cluster. This should be pretty self-explanatory if you are familiar with Spark. If you need some more information, visit the Create Cluster documentation page.

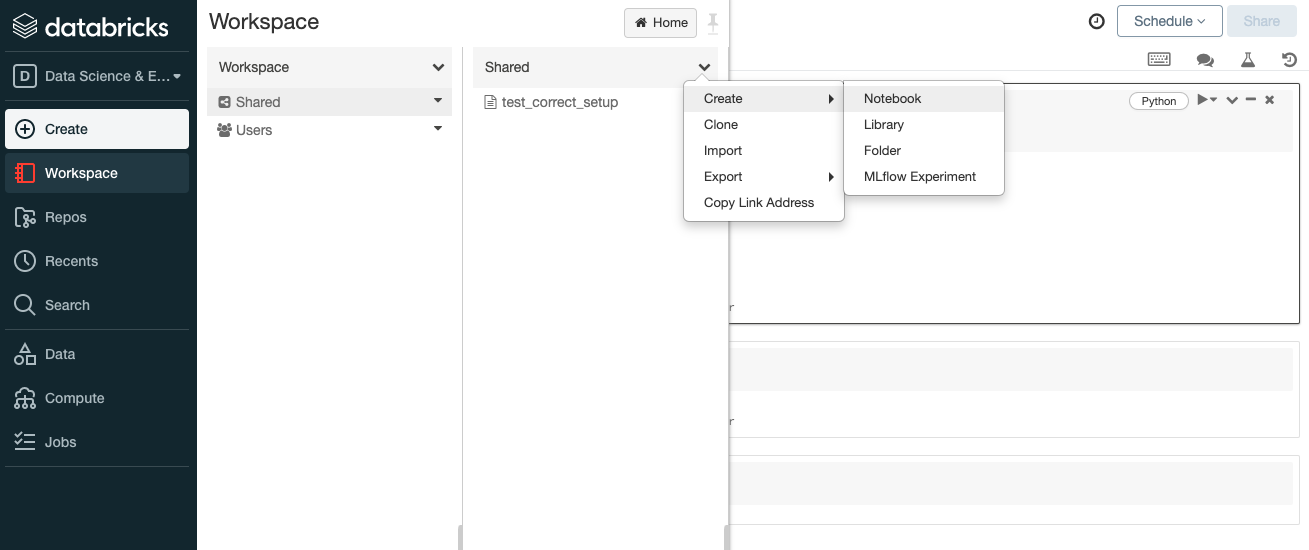
When you click on “Create Cluster“ a cluster will be deployed. This may take a few minutes. After the cluster is created you can select “Workspace“ > “Shared“ > “Arrow Down“ > “Create“ > “Notebook“ to create a Databricks Notebook and execute Spark Queries interactively in Python, Scala, Java or SQL. The SparkSession will already be created and accessible over the spark variable.

Under “Import“ you can upload a file (e.g. .py, Jupyter Notebook etc.) from your local file system to the workspace as well.
Alternatively, you can create a Databricks Job by selecting the “Jobs“ tab > “Create Job“.

Here you define a cluster as in the “Compute“ section and link a Notebook to it. Instead of working interactively the job can only run as a whole. However, it only incurs the cheaper “Jobs Compute“ costs instead of the “All-Purpose Compute“ costs (see next section).
For a complete guide on the Databricks Workspace please refer to the Databricks quick start documentation.
Understanding available Azure Databricks VMs and Pricing
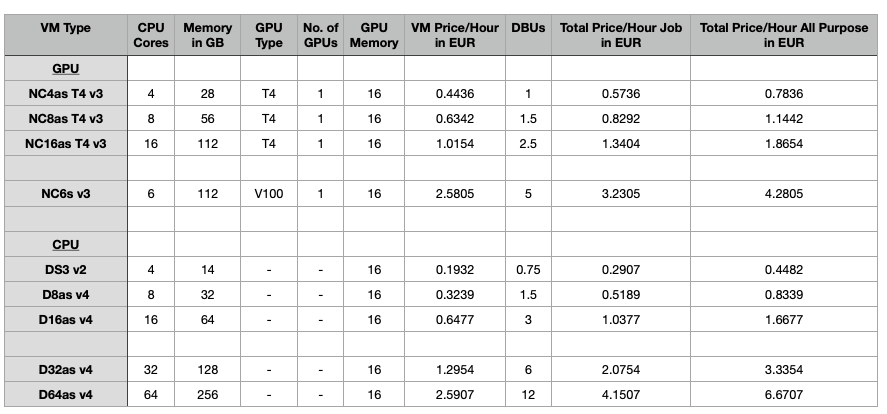
The costs for an Azure Databricks Workspace can be divided into two main categories. Azure Resources Costs and costs for Databricks Units (DBUs). The cost of a DBU depends mostly on whether you are using the Standard or Premium Tier when setting up the Databricks Workspace and whether you are using an “All-Purpose Clusters“ or a “Job Clusters“.

The amount of DBUs consumed per hour depends on the VM type and is displayed on the “Create Cluster“ window in the Databricks Workspace.
The costs for the Azure Resources are dominated by the price Azure charges for its VMs. An overview of the prices can be found on the VM pricing page.
Table 1 shows relevant VMs and their associated costs per hour. Note that the price-per-hour for the „NCas Family“ (T4 GPU) is quite comparable to the CPU VMs.
Sources:
https://azure.microsoft.com/en-gb/pricing/details/databricks/
https://azure.microsoft.com/en-gb/pricing/details/virtual-machines/linux/
Additionally, Databricks creates an Azure Blob Storage and Azure Virtual Network during workspace deployment that create some additional costs that we will not go into here.
Setting up the Rapids Accelerator on Databricks
Installing the plugin on Databricks mainly consists of configuring a Databricks cluster with appropriate cluster and Spark configs as well as adding a init script that is executed at each cluster creation on each worker. The init script downloads and installs the actual plugin on the cluster.
Thus, the first step is getting the init script into the Databricks File System (DBFS). This has to be done once. One way is to create a small cluster (e.g. Single Node Standard_DS3_v2) and run a prepared notebook that writes the init script for a given Databricks Runtime from a python string to DBFS. Afterward, you can create the actual GPU cluster, reference the init script and set the configs.
Create a small CPU single node cluster and execute the following Python code in a notebook:
|
1 2 3 4 5 6 7 8 9 10 |
# Create init script for Runtime 9.1 LTS ML GPU dbutils.fs.mkdirs("dbfs:/databricks/init_scripts/") dbutils.fs.put("/databricks/init_scripts/gpu_init.sh",""" #!/bin/bash sudo wget -O /databricks/jars/rapids-4-spark_2.12-21.12.0.jar https://repo1.maven.org/maven2/com/nvidia/rapids-4-spark_2.12/21.12.0/rapids-4-spark_2.12-21.12.0.jar sudo wget -O /databricks/jars/cudf-21.12.2-cuda11.jar https://repo1.maven.org/maven2/ai/rapids/cudf/21.12.2/cudf-21.12.2-cuda11.jar""", True) # Source: https://nvidia.github.io/spark-rapids/docs/demo/Databricks/generate-init-script.ipynb |
Terminate the cluster afterwards.
Now you will create the actual GPU cluster that runs the plugin. Create a cluster with:
- Databricks Runtime 9.1 LTS ML GPU.
- Cluster mode “Standard“. Single Node is not supported.
- Disabled autoscaling.
- A GPU worker type from Table 1 e.g. “Standard NC4as T4 v3“. Using multiple GPUs on one worker is not supported in Databricks. The GPU architecture must be compatible with the plugin, i.e. Nvidia T4, V100 or A Series.
- The desired worker count, e.g. “1“ should do for starters.
- A driver type. I would suggest the cheapest one “Standard NC4as T4 v3“ unless there is a good reason to use a bigger one.
- The path to the init script: dbfs:/databricks/init_scripts/gpu_init.sh . („Advanced options“ >> „Init Scripts“)
- Following Spark configs („Advanced options“ >> „Spark“ >> „Spark configs“)
|
1 2 3 4 5 6 7 |
spark.plugins com.nvidia.spark.SQLPlugin spark.task.resource.gpu.amount 0.1 spark.rapids.memory.pinnedPool.size 2G spark.locality.wait 0s spark.databricks.delta.optimizeWrite.enabled false spark.sql.adaptive.enabled false spark.rapids.sql.concurrentGpuTasks 2 |
spark.plugins com.nvidia.spark.SQLPlugin activates the plugin and is the most essential config entry. spark.sql.adaptive.enabled false disables adaptive query execution and spark.databricks.delta.optimizeWrite.enabled false disables delta optimized write. Disabling these two features is specific to Databricks. The remaining configs influence the performance of Spark and are being set to more appropriate defaults for the GPU. For now, just set them as suggested and don’t think too much about them. We will look at Spark configs to tune the application in the next blog post.
Finally, certain features such as pandas UDF GPU support require some additional configs to be set. Right now, do not bother with that either. Otherwise, check out the official Nvidia documentation.

It is important to configure the cluster exactly as intended. Failing to do so may easily lead to the plugin not working or the cluster shutting down without an appropriate error message. For instance, I initially chose “Single Node“ mode in Databricks (driver = worker) although “Standard Mode“ must be used. The cluster did start and regular Python and Scala calls could be executed in a notebook. However, when running a Spark action, the job started but never progressed.
Therefore, to check if everything is set up correctly, you may run the following Python code to test if the plugin is working as expected.
|
1 2 3 4 5 6 7 8 9 10 11 12 |
# Execute in a notebook df = spark.range(10) df.explain() # Output should be similar to this: # # == Physical Plan == # GpuColumnarToRow false # +- GpuRange (0, 10, step=1, splits=4) # In another cell df.write.mode("overwrite").parquet("/test/dummy.parquet") # check Spark UI of Job |
The output of explain should show the GpuRange operation and the job writing the dummy data should finish successfully. You might also have a look at the execution plan in the Spark UI that should show the GPU operations.

Limitations of using the Rapids Accelerator on Databricks
Using the plugin on Databricks comes with several drawbacks compared to other environments. Most importantly, Adaptive Query Execution (AQE) is not supported which negatively impacts the performance. Also, a GPU VM as the Spark Driver Node must be used which can be a cost disadvantage if the overall cluster size is not too big. Additionally, only a single GPU per node can be effectively utilized. This leaves only 4 VM types that we can effectively use in Azure for our purposes. These are the ones summarized in Table 1 above. Note that in Azure Databricks there is no VM with an A100 GPU available and that the V100 machine has only 6 CPU cores. We will see that the number of CPU cores is still relevant for the Spark plugin, even when using GPUs.
On the other hand, setting up the plugin on Databricks and experimentally working with it is comparatively straight forward which makes Databricks a good choice to get started.
Running a Demo
Let’s have a look at a demo that Nvidia offers. In the “Getting Started“ section of Databricks, AWS-EMR and GCP Dataproc there is a reference to a Python Jupyter Notebook. The notebook is slightly different w.r.t. to the initial setup in the respective service. You can find the “Databricks version“ of the notebook under the demo tab as well.
The notebook downloads a approx. 4 GB version of the “Fannie Mae Single-Family Loan Performance Data“ consisting of two dataset “acquisition“ an “performance“ partitioned over 4 csv files. The datasets are summarized in Table 2.

In code, the schema for the datasets is defined and both datasets are transcoded to parquet format in an initial Spark action. The parquet encoded datasets are loaded again, transformed, joined and written out as another parquet file in another Spark action thereafter. For both Spark actions the runtime is measured and printed after each action completes. Before each action, some Spark configs are set to optimize the performance of the GPU runs.
|
1 2 3 4 5 6 7 8 9 10 11 12 13 14 15 16 17 18 19 20 21 22 23 24 25 26 27 28 29 |
# Exerpt from notebook available at: spark.conf.set('spark.rapids.sql.enabled','true') spark.conf.set('spark.rapids.sql.explain', 'ALL') spark.conf.set('spark.rapids.sql.incompatibleOps.enabled', 'true') spark.conf.set('spark.rapids.sql.batchSizeBytes', '512M') spark.conf.set('spark.rapids.sql.reader.batchSizeBytes', '768M') # Lets transcode the data first start = time.time() # we want a few big files instead of lots of small files spark.conf.set('spark.sql.files.maxPartitionBytes', '200G') acq = read_acq_csv(spark, orig_acq_path) acq.repartition(12).write.parquet(tmp_acq_path, mode='overwrite') perf = read_perf_csv(spark, orig_perf_path) perf.coalesce(96).write.parquet(tmp_perf_path, mode='overwrite') end = time.time() print(end - start) # Now lets actually process the data\n", start = time.time() spark.conf.set('spark.sql.files.maxPartitionBytes', '1G') spark.conf.set('spark.sql.shuffle.partitions', '192') perf = spark.read.parquet(tmp_perf_path) acq = spark.read.parquet(tmp_acq_path) out = run_mortgage(spark, perf, acq) out.write.parquet(output_path, mode='overwrite') end = time.time() print(end - start) |
In the beginning, leave these configs as they are and play around with the infrastructure first. Comment these settings out when running on “CPU only“ though. You may want to try out different numbers of workers/instances, workers with a different number of CPU cores (yes, also when running on the GPU), different GPUs (T4, V100) and different numbers of GPUs per worker. Whatever is supported in your setup. It may be helpful to adjust the notebook to log the runtime and the environment settings. In the appendix at the end of this article, you will find some sample code to extract some important metrics to log from the Databricks environment. Additionally, the runtime for the GPU has a higher variance as compared to the CPU. Therefore, I would suggest repeating the measurements several times and taking a median of them.
On this problem, you will probably experience that the biggest performance differences come from the number of CPU cores available (in CPU only and GPU accelerated mode) and whether a GPU is available or not. That is, using a more powerful GPU (e.g. V100 instead T4) will not make much of a difference and having more GPUs does also not improve the performance if the number of CPU cores stays the same. Since the data is not too big this might not be too surprising. What I initially totally underestimated though is the impact of the number of CPU cores in GPU mode. Figure 1 summarizes my measurements.
Performance and Cost Results on Demo
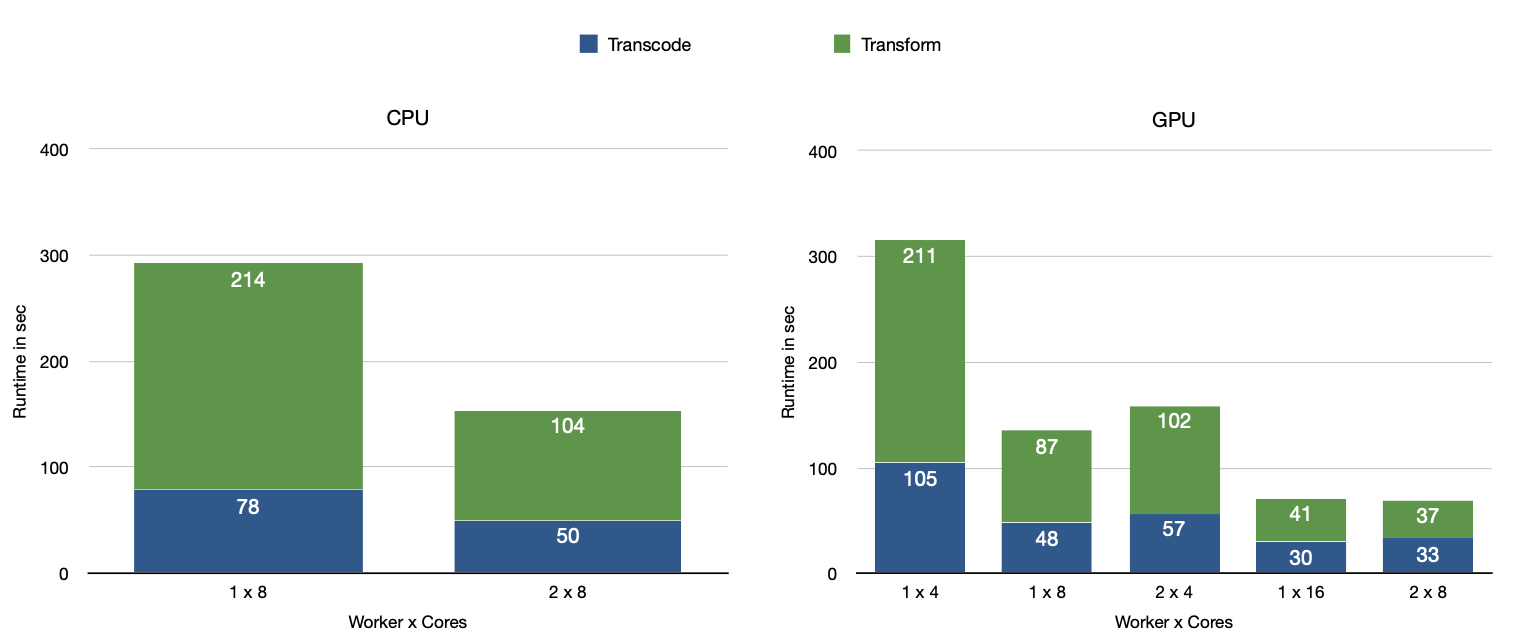
As you can see on the right of Figure 1 when using 1x worker with 4x CPU cores and a T4 GPU (1×4 GPU on the right side) compared to 1×8 GPU the total runtime drops from 316 sec to 135 sec (2.34x speedup). On the other hand, the 2×4 GPU setup which also gives us 8x CPU cores in total but with 2x T4 GPUs is even slightly slower than the 1×8 GPU cluster. As such the improvement here most probably comes from the additional CPU cores. A similar pattern can be observed when comparing the GPU setup with 8x CPU cores to 16x CPU cores (1×16 GPU and 2×8 GPU).
When examining the Spark UI, we will notice that some operations are actually performed on the CPU which explains the importance of the number of CPU cores. This is caused by the plugin having a cost-based optimizer that decides whether it is beneficial to send the data to the GPU for processing or whether it is better to process on the CPU. However, we will explore in the next blog post that this effect also occurs when only GPU operations are included in the execution plan.

Coming back to Figure 1: When comparing the CPU to the GPU cluster i.e. 1×8 CPU (left) to 1×8 GPU (right) and 2×8 CPU to 2×8 GPU, we observe that applying the plugin gives an approx. 2.2x speedup in both cases. Although “Transcode“ and “Transform“ both improve on their own, the improvement of “Transform“ (2.45x speedup on 1×8) is much larger than of “Transcode“ (1.63x speedup on 1×8). This is surprising since the FAQ page states that the GPU is especially good at transcoding from csv to parquet.

Figure 2 displays the costs for the above runs excl. the cost for the driver. In other environments than Databricks, the driver can be the same for both CPU and GPU clusters. Therefore, its cost is a constant. Also in real-world setups with more workers, the driver costs become neglectable. In the appendix, you can find a Figure incl. driver cost.
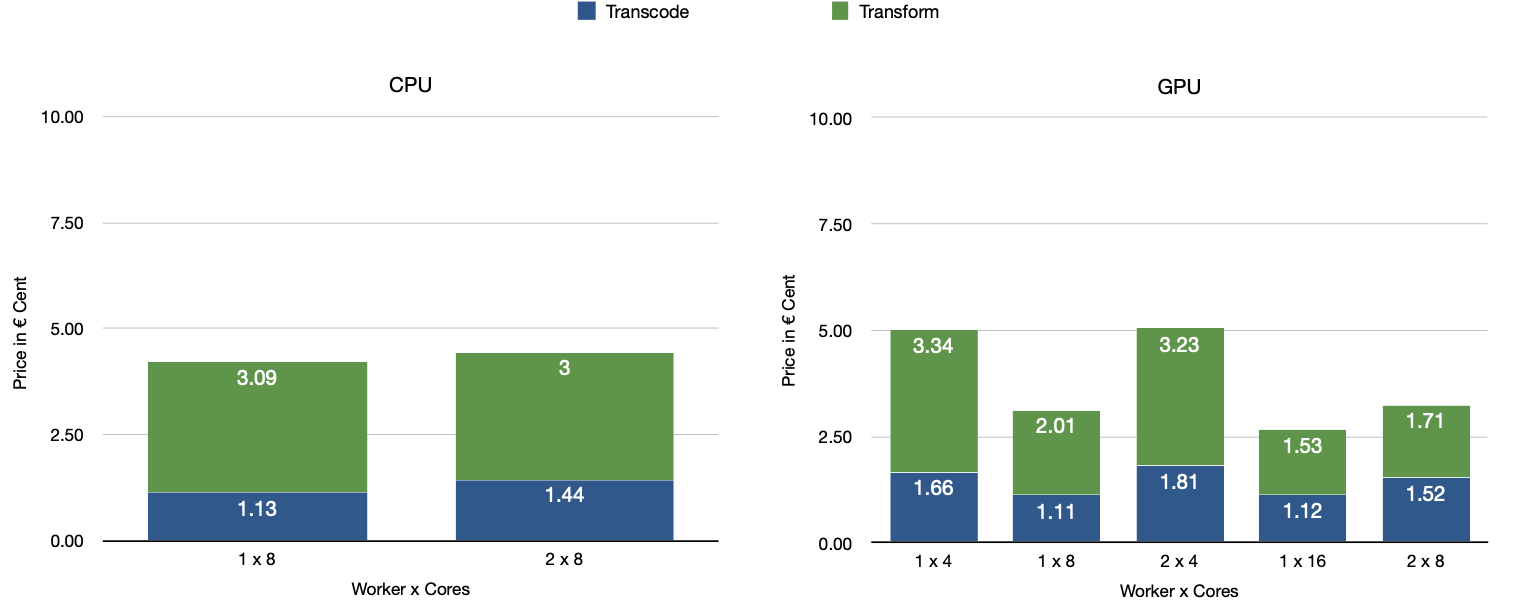
We see that for the CPU clusters the costs are almost the same. This is because 2×8 CPU is twice as expensive as 1×8 CPU but also almost twice as fast. The GPU clusters are in two cases slightly more expensive but in 3 cases cheaper. When comparing the two cheapest variants for CPU and GPU (1×8 CPU and 1×16 GPU), the GPU is 38% cheaper than the CPU cluster. So the second most expensive setup in terms of price-per-hour 1×16 GPU (right after 2×8 GPU which is more expensive because of the additional GPU) is the cheapest in terms of cost-to-solution. Finally, the relevance of finding the right balance between CPU cores and the number of GPUs in the GPU cluster for the given problem becomes apparent.
Nvidias Cost and Performance
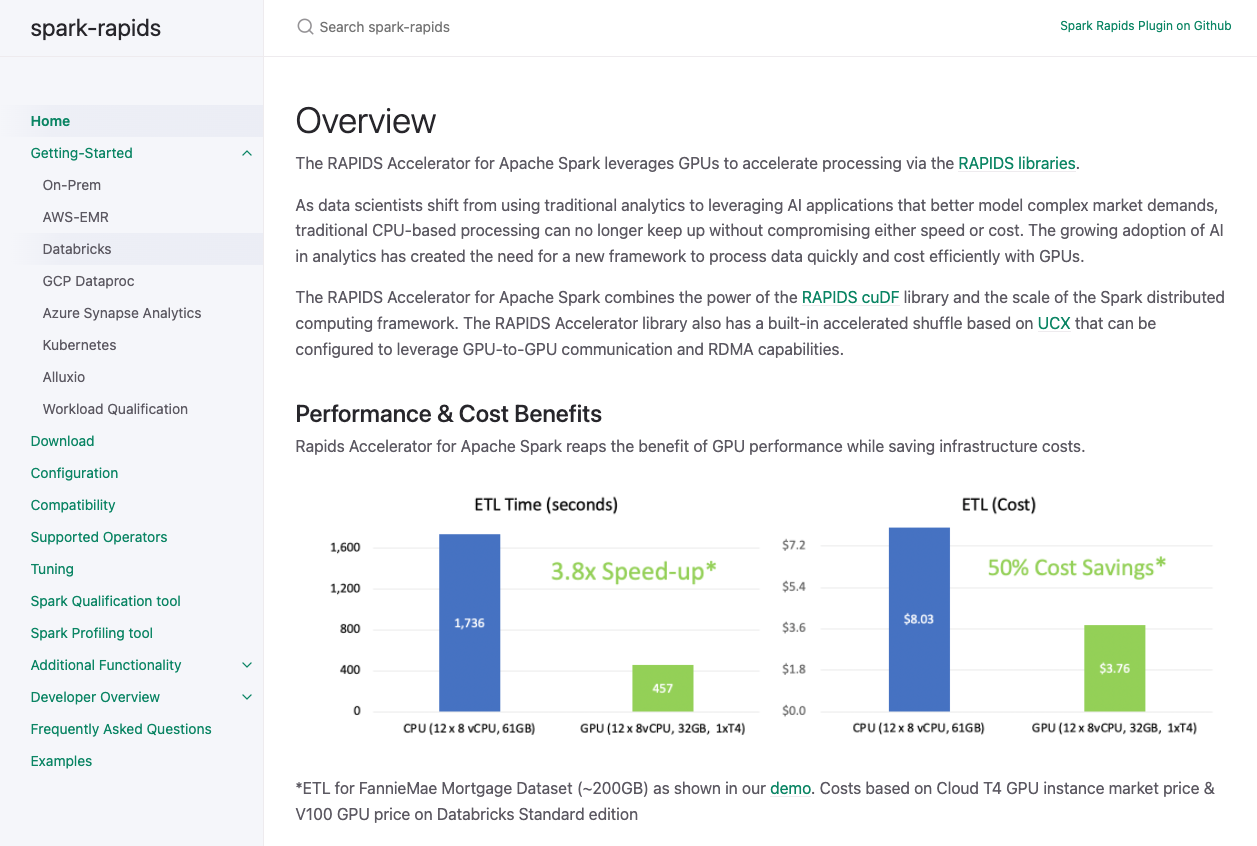
Recall the documentation’s home page from the beginning of this article.
It shows a figure displaying the runtime and cost improvements of the same ETL transformations measured on GCP Databricks using T4 GPUs as well. However, their results are based on a 200 GB version of the dataset and they are thus using a bigger cluster with 12x workers. They report a CPU to GPU speedup of 3.8x and a cost improvement of 50%. Their better results are probably due to their bigger setup. If there is more work to accelerate, the improvements are obviously bigger. However, it is interesting to witness that significant speedups with no higher costs on this small amount of data are possible. If you are interested, watch this talk from Nvidia where they present speedups of up to approx. 25x. Although such speedups are not what we are used to from training deep learning models, they can still drastically reduce costs and facilitate development iterations for ETL applications.
Conclusion
This should be it for the day. In summary, we have explored how to set up the plugin and what pitfalls to avoid when doing so. We have also seen that using GPUs is not necessarily more expensive (in fact it will often be cheaper) and that we can already get speedups on small datasets with low-cost GPUs. Although the computations are run on the GPU the number of CPU cores available is still relevant since not all operations are performed on the GPU due to cost-based optimization. Finally, we looked at what is possible in terms of speedup in larger settings according to Nvidia.
In the next blog post of this series, we will have a look at the most important Spark configs for your GPU Spark application (check out the “Tuning“ tab on the Website if you cannot wait for it), what other operations the plugin is (supposedly) good at and some experiments with bigger synthetic data created by an own data generator and up to 9x speedup and 82% cost reductions. Stay tuned.
Appendix
Log Databricks Cluster Parameters
|
1 2 3 4 5 6 7 8 9 10 11 12 13 14 15 16 17 18 19 20 21 22 23 24 25 |
# Run from Databricks Notebook import requests import json ctx = dbutils.notebook.entry_point.getDbutils().notebook().getContext() host_name = ctx.tags().get("browserHostName").get() host_token = ctx.apiToken().get() cluster_id = ctx.tags().get("clusterId").get() response = requests.get( f'https://{host_name}/api/2.0/clusters/get?cluster_id={cluster_id}', headers={'Authorization': f'Bearer {host_token}'} ).json() log = { "cluster_name": response["cluster_name"], "spark_version": response["spark_version"], "driver_node_type_id": response["driver_node_type_id"], "node_type_id": response["node_type_id"], "num_workers": str(response["num_workers"]), "cluster_cores": str(response["cluster_cores"]), # includes no of driver cores as well "cluster_memory_mb": str(response["cluster_memory_mb"]), # includes driver memory as well "spark_conf": json.dumps(response["spark_conf"]) } |
Compute Costs incl. Driver

In Databricks we must use a GPU driver node which adds significantly to the total cost-to-solution since we have a small setup with 2 workers at most. For the CPU the additional cost is neglectable since the cheapest CPU node is very cheap compared to the worker nodes. In the best case, we are still slightly cheaper with GPU.


