Notice:
This post is older than 5 years – the content might be outdated.
In the following blog post we talk about the challenge of developing a contextual assistant (aka chatbot) with Rasa, the flexibility of Flutter and the communication between these two frameworks.The project started in the context of an inovex practice, a student-only project which emulates all aspects of a regular billed project, including a stakeholder, PO, scrum master and technical coaches.
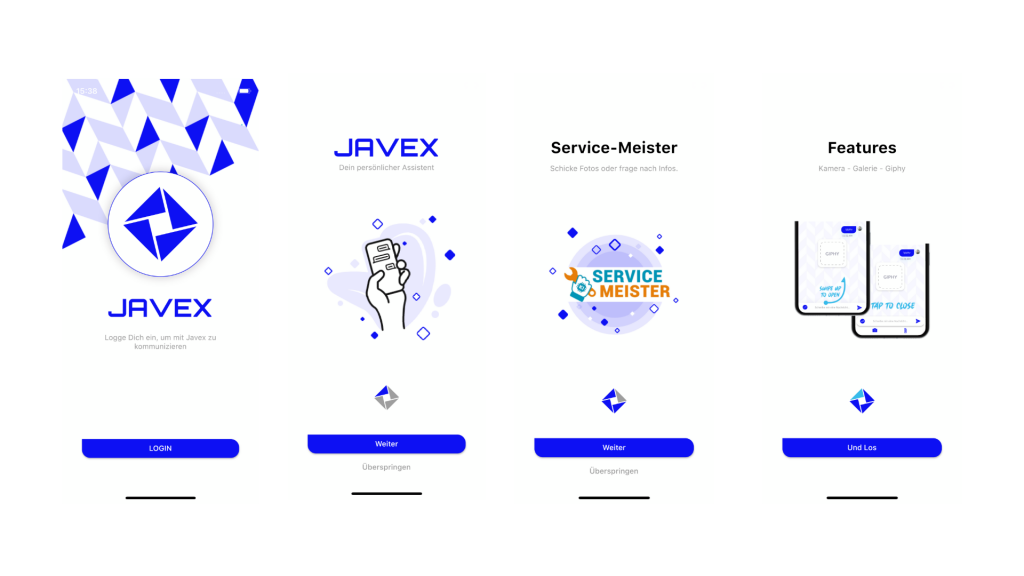
As we looked into new frameworks and technologies for inspiration, two of them caught our attention. Flutter as a new cross-platform framework, and Rasa as a framework for building contextual assistants. We decided to combine both frameworks to build a cross-platform chatbot, called JAVEX.
Rasa
This blogpost is not exactly intended as an Rasa tutorial for beginners, for the fact that there are already informative documentation pages along with well written tutorials.
Building our first chatbot functions, it was very important for us to test the chatbot with real users. Therefore we used Rasa X, a tool for Conversation-Driven Development (CDD). It was motivating for us as a developer team to see the assistant already in action with test users after the first week of development. With the help of Rasa X we were immediately able to review the conversations with test users and annotate the wrong and right decisions that the assistant made. These user tests resulted in more Natural Language Understanding (NLU) training data for our chatbot’s NLU components to learn from. To synchronize those newly acquired training data examples with our Git repository, we used the comfortable Gitlab CI/CD integration of Rasa X.
Our main goal was not to build a simple FAQ chatbot, which would only answer questions to some predefined topics. We wanted to go further – up to the level of a contextual assistant.
![]()
To understand the meaning of the term Contextual Assistant we would like to encourage you to read a Rasa blog post about this topic. But to sum it up briefly, a Contextual Assistant should, according to Alex Weidauer, Co-founder & CEO of Rasa, meet the following six requirements:
- Gracefully Handle Any User Goal
- Read/Write Contextual Data
- Disambiguation: Remove Uncertainty
- Extract Contextual Data
- Change of Context
- Business Logic
We kept all these requirements in mind when we developed our chatbot and tried to meet as many of them as possible. We would like to elaborate on a few selected approaches below.
To gracefully handle any user goal we used the Two Stage Fallback policy of Rasa which is used when the chatbot is not sure enough how to proceed the dialogue flow or what the intent of the user was. The Two Stage Fallback asks the user for confirmation of his intent when uncertain – e.g. when the user asks: “Who works for inovex?“, the chatbot might ask for additional confirmation: “Do you mean ‘How many employees does inovex have’?“. In addition to that, we implemented a functionality that we call Three Stage Fallback. When using only the Two Stage Fallback policy and the user denies the suggestion of the chatbot, the bot asks the user to rephrase his question.
When the chatbot then still cannot understand the next question, it asks for a rephrasing of the question again. The result is an endless conversational loop of misunderstanding. With the third stage we give the user one chance to rephrase the question. However, if the chatbot is still uncertain about what to answer, it responds with a message that tells the user that this feature is not yet supported but that the developers will have a look at it. That is possible because we are able to review the user chat history by using the Rasa X Conversation-Driven Development functionalities.
As an additional functionality to achieve the goal of a Contextual Assistant we considered the fifth requirement from above: Change of Context.
With the use of the experimental response selector feature of Rasa we were able to classify our simple FAQs into topics. E.g. we distinguished between questions regarding inovex and the chatbot itself. With the possibility to know in which context the user is chatting, we were able to tell the user that a change of context is happening but that the chatbot was very pleased to discuss and help with other topics as well. This behavior should make the conversation seem more natural in contrast to ordinary FAQ responses.
By using a similar approach, we were able to identify consecutive, identical user intents. If the user asks our assistant roughly the same question at a certain time after asking the question for the first time, our assistant will still answer but indicate that he has answered this particular question already.
Flutter
Flutter is a young framework which is constantly developed further by Google. The very versatile framework offers many advantages. One of the biggest is the possibility to develop one code base for several platforms. Besides Android and iOS, Flutter-based applications can be started on the web and recently on desktop. Web support is in beta and desktop is still under development by the Flutter Team.
The advantages of Flutter and the requirement from our stakeholders to support both mobile platforms lead to the usage of Flutter for this project.
The single code base for Android and iOS was the main reason to use Flutter in the practice. The following part discusses the possibilities of Flutter and our experiences. In particular creating a basic Chat-UI and bringing the app to the web is considered.
Obviously, every chatbot needs a chat window. New messages should be added below and older messages should be made visible again by scrolling. Flutter offers a variety of widgets that help to create said window.
To create a chat window, all upcoming widgets have to be organized, that is what the Scaffold widget does. The first widget inside the Scaffold is the Flexible widget which can resize itself. The child widget below the Flexible is called Consumer widget. The child of the Consumer widget is a ListView.builder which receives a list of all messages and builds a ListView by including the messages. Accordingly, messages from the user are positioned on the right and messages from the bot on the left.

But how to update the chat from bot and user? Therefore we need the Notifier, in order to handle the state management. When a new message is sent by the bot or the user, the Consumer widget is notified.
The Notifier stores all messages written in one session.The Consumer updates itself and all its child widgets as soon as notified by the Notifier. Updating leads to all new messages being visible in the chat. Each time a message is added to the Notifier, it notifies the Consumer widget, whether the message comes from the bot or the user. Hence the UI is updated and the ListView is rebuilt including the new message.
To chat with the chatbot, we need a text field and a sending button which is also part of the Scaffold widget. By pressing the button the text is saved as a message in the Notifier. As soon as a message is added, the Consumer is notified and the UI is updated – as the process described above. This message is also sent to Rasa. The reply will again trigger an update of the chat.
The following is our approach for implementing a basic chat UI in Flutter. There are multiple ways explained online for achieving this functionality (see here). We had no problems to integrate this solution into our app or to extend it with features. We even managed to add images and even interactive widgets to the chat with ease, so it was not limited to text.

Communication with Rasa
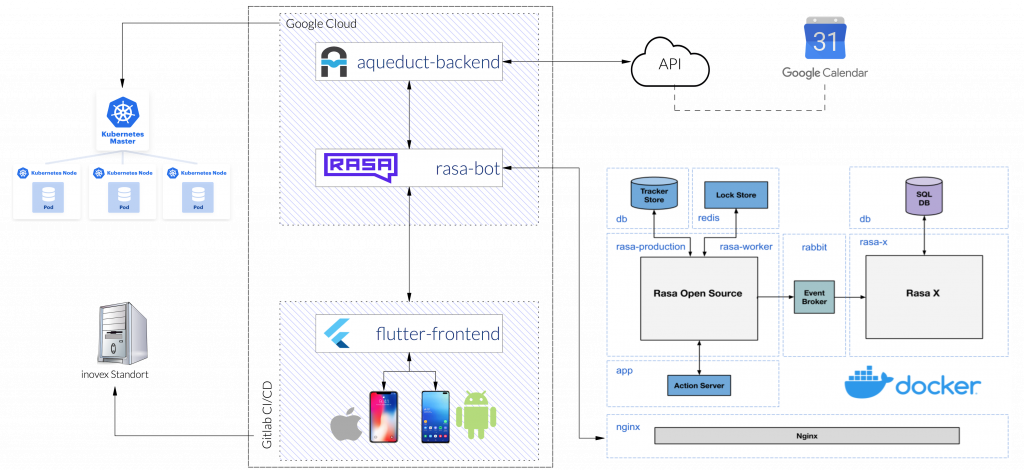
We developed an app for Android and iOS with Flutter that allows the user to get in touch with the contextual assistant. Rasa was hosted in a Google Cloud managed Kubernetes cluster (GKE). The two components communicate via HTTP. The app itself communicates exclusively with Rasa, which in turn communicates with the rest of the backend. The information transfer between Flutter and Rasa takes place via HTTP API. A defined webhook exists at Rasa, which expects a predefined JSON and responds accordingly. Flutter sends a request, as a GET, and receives a JSON response.
The answers from RASA can be different. Various JSON objects are used for different purposes. If only one text needs to be displayed, the default JSON from Rasa can be used. If Rasa should trigger a custom action with the response in Flutter, a custom JSON has to be created.
The response from Rasa is evaluated and a custom builder decides which widget will be added to the chat. All necessary information can be found in the JSON and must be extracted. We also looked at two other functionalities. For creating a calendar event we need to communicate with the Google calendar API. Another service was developed for access and made available in the Google Cloud. Also our chatbot should be made available via Slack. The integration of Slack can easily be achieved with the help of this tutorial. In this case no widgets can be displayed which has to be considered when receiving custom JSONs from Rasa.
Besides providing information about the company inovex, we have implemented additional functionalities.
- Google Calendar integration
- custom theme – dark mode
- reminder notifications
- speech recognition
- image capturing
The user had to login with his Google credentials and grant access to his Google calendar. So it was possible to create an appointment with an optional description by chatting with Rasa and to display any number of future appointments. We used the feature for custom themes to experiment with the framework and handling of state management. As a final feature we implemented a reminder function with local push notifications. The note „Remember appointment with inovex in 3 hours“ resulted in a local notification on the cell phone in 3h – regardless of whether the app is running or not. Speech recognition and image capturing were easy to integrate with third party libraries from the pub.dev website.
Flutter – Web
In the last weeks of the project we evaluated the possibility to move the existing project to the web. Flutter advertises with the possibility to deploy not only to Android and iOS but also to the web. This function however is only in a beta phase and not stable yet. Since there was only little time left in our six month project and a completely new UI design had to be implemented, we agreed to consider only the fundamental functions. Thus, a large part of the code could be reused without changes, but in some places it was still necessary to make case distinctions. Nevertheless, the deployment to a web app was a success.
All in all, we can say that Flutter supported the cross-platform implementation of our chatbot. Even late decisions like the web application were doable. All of us are really looking forward to working with Flutter in future projects again.
Future Prospects
But we accomplished to build a real Contextual Assistant, even though the project had a predefined, narrow scheduled of six months. We were able to tackle many different features – from starting with a simple FAQ, to including Google Calendar functions and ending with the web support. Before the project ended we reached out to other internal projects, like the Service-Meister team which is part of a large consortium of IT and production companies. This consortiums goal is to establish an AI-based Ecosystem for Technical Service in the age of Industry 4.0. Our projects were a perfect supplement, so we decided to go forward and integrated them.
Finally, we can say that Flutter and Rasa are young, yet solid frameworks to build a real-world application. The architecture of both frameworks is very flexible, allowing the dev team to easily handle feature requests without having to rewrite existing components. Please see Flutter’s and Rasa’s websites for more detailed information. Both are open-source frameworks and provide easy getting-started tutorials, codelabs, and master classes.
We encourage you to look into and read more about both frameworks. Here are some good starting points from our reading list.
Further reading list for this topic:
-
- Flutter – beginning of a new Era?
- Flutter – Case Study Südzucker
- Chatbots und digitale Assistenten