TL;DR:
This article walks you through integrating a TPM 2.0 chip into an embedded Linux system based on Yocto and Raspberry Pi CM4. You’ll learn how to enable TPM support in the kernel, set up secure MQTT credentials with tpm2-tools, and use the TPM as a hardware root of trust for identity and data protection. The setup is fully reproducible and tailored for production-ready IoT devices.
Wherever connected devices are utilized, it is essential to pay special attention to security. It is crucial to assess the existing risks in order to implement appropriate measures. A device that is publicly accessible, such as a surveillance camera, requires more careful consideration than a device that is physically secured and accessible only to authorized personnel.
This article examines a project that employed a Trusted Platform Module (TPM) to mitigate the assessed security risks. A Trusted Platform Module serves a multitude of important use cases that enhance device security. It can generate, securely store, and manage cryptographic keys, providing a robust foundation for data protection. Additionally, a TPM is capable to verify the integrity of software and firmware during the boot process, ensuring that only authentic and untampered components are loaded. By establishing secure boot environments, it safeguards the system from potential threats right from startup. Furthermore, the TPM plays a vital role in authentication and attestation, enabling devices to prove their identity and integrity, thereby confirming that they are indeed what they claim to be.
The following sections will detail the setup, the challenges encountered, and the chosen solution.
Additionally, it will illustrate how to integrate the TPM into Yocto and provide general guidance on working with the TPM.
Initial Situation
The hardware in use is a custom development based on the Raspberry Pi Compute Module 4. This hardware functions as an edge device, designed to facilitate both local and cloud access. External hardware is connected to the edge device, utilizing protocols such as Modbus TCP or Modbus RTU. To support these functionalities, the edge device is equipped with the necessary hardware modules.
The connection to the cloud is established via MQTT. All locally generated data is synchronized with the cloud using this protocol. Device settings can be configured both locally and through the cloud interface.
Local access to the device is difficult for unauthorized individuals. The edge device is typically located on the premises and is additionally secured within a restricted area. If someone were to gain physical access, the potential breach of the edge device would be the least of the concerns (a matter of weighing risks). However, the connection to the cloud and external access must be restricted and secured.
Key data of the system:
Hardware: Custom hardware based on Raspberry Pi Compute Module 4
Operating System: Yocto Linux (Kirkstone – by the time of writing this article)
Update mechanism: AB updates (Mender)
Partitioning: 2x rootfs (AB), 1x data partition, which is not affected by updates, read-only rootfs, no execute flag for data partition
TPM: Infineon SLB9670
There are two key issues that need to be addressed:
- Serial Number Storage: Each device has a unique serial number that must be stored securely. It is essential that this serial number remains intact through factory resets, system updates, and even after a full flash of the storage. Consequently, it cannot be stored within the device’s storage itself.
- MQTT Credentials: The device requires MQTT credentials from the Cloud, which must be encrypted for secure transmission. It is important to note that each device will have its own distinct MQTT credentials.
Approach
Serial number
A TPM offers the possibility to store the serial number in non-volatile (NV) space during the device provisioning process. This method ensures that the serial number remains intact through factory resets, updates, and even a full flash of the storage. Furthermore, the serial number is accessible to everyone since it is not stored in an encrypted format. To prevent accidental overwriting, it should incorporate some form of write protection. However, it is important to note that with root access, it remains possible to delete the serial number and reset it. How to define the NV space and how to store the serial number is explained in detail in the Chapter Store serial number in NV space.
MQTT
Since we are having a read-only rootfs and a no-execute flag on the /data partition, this offers the possibility to encrypt a password with a public key or a TPM key and store this file on the /data partition. Only the TPM can decrypt this password, since the private key is kept safe and cannot be extracted from the TPM. Furthermore, the TPM can only be accessed with root permissions, and the only application that is able to interact with the TPM is our own. The attacker has to obtain root access to get the password, but in this case the attacker has a lot of other possibilities, which might be way more interesting for him.
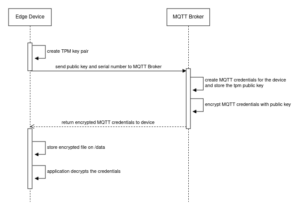
The following diagram illustrates the simplified communication between the edge device and the cloud during the initial boot. An additional authentication step is involved, but is not depicted here. For simplicity, envision that during provisioning, the serial number is briefly activated on the cloud side to facilitate the registration process.
Provisioning
Understanding the provisioning process of a device is essential, and the following key steps are involved:
- The serial number is automatically written to the NV storage of the TPM.
- The Yocto image is automatically flashed onto the device.
- The device undergoes automated testing to ensure, among other things, that the externally connected hardware is functioning properly.
- The device is registered in the cloud. At the time of writing, this process was partially automated, requiring a manual step to accept the device on the cloud side.
Hands on Yocto
This chapter outlines the necessary adjustments to Yocto for supporting the TPM.
Given our custom hardware, we have introduced a new machine configuration based on the Raspberry Pi Compute Module 4 configuration. This machine configuration details all hardware-related aspects that differ from the Compute Module 4, providing an ideal location to incorporate the requirements for the TPM.
The extension of the machine configuration file is as follows:
|
1 2 3 4 5 6 7 8 9 |
MACHINE_FEATURES:append = "tpm2" RPI_EXTRA_CONFIG += "dtoverlay=slb9670-tpm" RPI_KERNEL_DEVICETREE_OVERLAYS += " \ overlays/slb9670-tpm.dtbo \ " # TPM stuff IMAGE_INSTALL:append = " tpm2-tools libtss2 libtss2-tcti-device tpm2-abrmd tpm2-pkcs11" |
Since our custom hardware supports the tpm2 feature set, this is set as MACHINE_FEATURE.
The operating system requires accurate information on how to interact with the TPM. To facilitate this, a Device Tree Overlay is necessary, as it provides the essential details about the additional hardware. For the overlay to be loaded during the device’s boot process, it must be included in the config.txt file (specific to Raspberry Pi). This is achieved by appending the name of the Device Tree Overlay to the RPI_EXTRA_CONFIG setting.
Additionally, several packages are required to effectively use and interact with the TPM from a user or application perspective (IMAGE_INSTALL). For instance, tpm2-tools installs all tpm2 commands in the /usr/bin directory. To enable the installation of these packages, it is essential to add the meta-security layer to the bblayers.conf file.
The device tree overlay looks like the following:
|
1 2 3 4 5 6 7 8 9 10 11 12 13 14 15 16 17 18 19 20 21 22 23 24 25 26 27 28 29 30 31 32 33 34 35 36 37 38 39 40 41 42 43 44 45 46 47 48 49 50 51 52 53 54 55 56 57 58 59 60 |
/dts-v1/; /plugin/; / { compatible = "brcm,bcm2835", "brcm,bcm2708", "brcm,bcm2709"; fragment@0 { target = <&gpio>; __overlay__ { spi1_pins: spi1_pins { brcm,pins = <19 20 21>; brcm,function = <3>; /* alt4 */ }; spi1_cs_pins: spi1_cs_pins { brcm,pins = <18>; brcm,function = <1>; /* output */ }; }; }; fragment@1 { target = <&spi1>; frag1: __overlay__ { /* needed to avoid dtc warning */ #address-cells = <1>; #size-cells = <0>; pinctrl-names = "default"; pinctrl-0 = <&spi1_pins &spi1_cs_pins>; #address-cells = <1>; #size-cells = <0>; pinctrl-names = "default"; pinctrl-0 = <&spi1_pins &spi1_cs_pins>; cs-gpios = <&gpio 18 1>; status = "okay"; slb9670: slb9670@0{ compatible = "infineon,slb9670"; reg = <0>; /* CE0 */ #address-cells = <1>; #size-cells = <0>; spi-max-frequency = <32000000>; status = "okay"; }; }; }; fragment@2 { target = <&aux>; __overlay__ { status = "okay"; }; }; __overrides__ { cs0_pin = <&spi1_cs_pins>,"brcm,pins:0", <&frag1>,"cs-gpios:4"; cs0_slb9670 = <&slb9670>,"status"; }; }; |
The Device Tree Overlay is primarily based on the one provided by Infineon, with minor adjustments, such as setting the chip select to 1 for this specific hardware. This configuration may vary depending on your hardware design. Furthermore, the TPM is connected to the Serial Peripheral Interface of the Raspberry Pi, utilizing GPIO pins 18-21, which is also reflected in the Device Tree Overlay.
To incorporate the Device Tree Overlay, the linux-raspberrypi recipe must be extended using a .bbappend file (named linux-raspberrypi_%.bbappend):
|
1 2 3 |
FILESEXTRAPATHS:prepend := "${THISDIR}/${PN}:" SRC_URI += "file://slb9670-tpm.dts;subdir=git/arch/${ARCH}/boot/dts/overlays" |
Hands on TPM
Store serial number in NV space
This chapter details the process of storing the serial number in NV space using CLI commands on the device. In our setup, this operation is performed automatically via script during the provisioning of each device.
How to define a NV space
In order to store the serial number of the device a NV storage space needs to be defined.
This space should be only writable once to prevent that it will be accidentally overwritten by the application. The serial number is written during the provisioning of the device. The NV space can be deleted with root access which offers the possibility to change the serial number (e.g. for refurbishing).
First, an authorization session is initiated to establish a policy using TPM2_CC_NV_Write, which ensures that the NV space can only be written once. This policy is then saved in the nvwrite.policy file.
|
1 2 3 4 |
tpm2_startauthsession -S /data/session.dat tpm2_policycommandcode -S /data/session.dat TPM2_CC_NV_Write tpm2_policynvwritten -S /data/session.dat -L /data/nvwrite.policy c tpm2_flushcontext /data/session.dat |
The “c“ at the end of tpm2_policynvwritten is not a typo; it is an argument that signifies the expected written state of the NV index. In this case, „c“ represents a clear state.
Occasionally, it is advisable to flush the context to prevent the TPM from running out of transient memory. This can be accomplished using the tpm2_flushcontext command.
The nv space is then defined via:
|
1 2 |
tpm2_nvdefine -s 20 -a "ownerread|authread|policywrite" -L /data/nvwrite.policy Output: nv-index: 0x1000000 |
- -s = size in bytes
- -L = policy file
- -a = attributes
- policywrite: A policy is required in order to write to this space.
- authread: Authentication, e.g. a password, is required for reading. However, in this instance, the password is not provided; therefore, reading can be performed without a password.
- ownerread: The TPM owner can read the data from nv space.
The output of this command is the NV index that is utilized, typically the next available index. In our scenario, the first usable address is 0x1000000.
The result of this can be seen via tpm2_nvreadpublic:
|
1 2 3 4 5 6 7 8 9 10 |
0x1000000: name: 000b6e9b58189207e920b30f65b06b9933aabf823f3ed063e8824602c0c465d13f7d hash algorithm: friendly: sha256 value: 0xB attributes: friendly: policywrite|ownerread|authread value: 0x8000420 size: 20 authorization policy: B7AFECEE9BF7BCBD5078F264DE85F7E361DC84F745DA7EFA34E91FDAF200EE9B |
How to write to the NV space
First a policy session has to be initiated again with the TPM2_CC_NV_Write command code.
|
1 2 3 |
tpm2_startauthsession -S /data/session.dat --policy-session tpm2_policycommandcode -S /data/session.dat TPM2_CC_NV_Write tpm2_policynvwritten -S /data/session.dat c |
Afterwards the NV space can be written once via:
|
1 |
tpm2_nvwrite 0x1000000 -i testWrite.txt -P session:/data/session.dat |
The contents of testWrite.txt will be written to address 0x1000000. It is important that the file size does not exceed the defined NV space size, which in this case is 20 bytes (as noted in the previous chapter). A policy session can be specified using the -P option.
As a result, the written attribute is now set, and any further write operations will be denied (as confirmed by tpm2_nvreadpublic):
|
1 2 3 4 5 6 7 8 9 10 |
0x1000000: name: 000b6e9b58189207e920b30f65b06b9933aabf823f3ed063e8824602c0c465d13f7d hash algorithm: friendly: sha256 value: 0xB attributes: friendly: policywrite|ownerread|authread|written value: 0x8000420 size: 20 authorization policy: B7AFECEE9BF7BCBD5078F264DE85F7E361DC84F745DA7EFA34E91FDAF200EE9B |
If an attempt is made to write to this NV space again, the following error message will be displayed:
|
1 2 3 4 5 |
WARNING:esys:../tpm2-tss-3.2.0/src/tss2-esys/api/Esys_NV_Write.c:310:Esys_NV_Write_Finish() Received TPM Error ERROR:esys:../tpm2-tss-3.2.0/src/tss2-esys/api/Esys_NV_Write.c:110:Esys_NV_Write() Esys Finish ErrorCode (0x0000099d) ERROR: Failed to write NV area at index 0x1000000 ERROR: Tss2_Sys_NV_Write(0x99D) - tpm:session(1):a policy check failed ERROR: Unable to run tpm2_nvwrite |
How to read the NV space
The read command is straightforward compared to the write command, as anyone is permitted to access this space.
|
1 2 |
tpm2_nvread -C o 0x1000000 -s 20 Output: `hello` |
- -s = size in bytes
- -C = context from which the read operation is performed. o refers to the owner context of the TPM.
Create key pairs for exchanging MQTT credentials
This chapter outlines the process of generating an RSA key pair for the encryption and decryption of MQTT credentials via CLI commands. In our setup, the key pair is generated by the application during the initial boot.
Create RSA Key for encryption and decryption (CLI)
The initial command, tpm2_createprimary, is used to create a primary key under the owner hierarchy (default). This command generates a context file, saved as primary.ctx, which facilitates further interactions with the TPM. Given that the TPM is not a particularly powerful computing unit, this process may take some time—approximately 35 seconds in our setup.
|
1 2 3 4 5 6 7 8 9 10 11 12 |
# create primary key - can take up some time (in this setup about 35 seconds) tpm2_createprimary -c primary.ctx # create a default key tpm2_create -C primary.ctx -u key.pub -r key.priv (Remark: key.pub and key.priv are encrypted with an internal symmetric key of the TPM) # load the key tpm2_load -C primary.ctx -u key.pub -r key.priv -c testkey.ctx # make the key persistent (handle looks like the follwoing: 0x81000001) HANDLE=$(tpm2_evictcontrol -c testkey.ctx | cut -d ' ' -f 2 | head -n 1) |
Subsequently, a default key is generated using tpm2_create. This key pair is then loaded with tpm2_load, producing a testkey.ctx file that can be utilized for encryption and decryption.
Keys can be recreated with the TPM, and using the same sequence and parameters will yield identical results, allowing for the consistent regeneration of this key pair whenever needed. To optimize this process, the key can be made persistent using tpm2_evictcontrol. This action results in a handle that can be employed for future interactions.
Encryption
The encryption of, for example, the content of a .txt file can be accomplished using tpm2_rsaencrypt:
|
1 |
tpm2_rsaencrypt -c 0x81000000 -o encryptedFile secret.txt |
The first parameter specifies the address of the persistent handle, while the second parameter indicates the output destination. In this instance, the encrypted data is saved to a file named encryptedFile in the current directory. The file secret.txt contains plain text, such as “hello world,“ which will be encrypted using the public key of the key pair.
After executing the command, the encryptedFile will not contain any readable text, for example:
|
1 2 3 |
/p�<��/���ܳ;*�����!��t�S.�&�s�Bo��� �4�ʷ�f��u��'�jEY3�>�` ���(�!�;s |
Decryption
A decryption can be accomplished using tpm2_rsadecrypt:
|
1 |
tpm2_rsadecrypt -c 0x81000000 -o decryptedFile encryptedFile |
The first parameter specifies the address of the persistent handle, which remains the same as for encryption. The second parameter indicates the output destination. In this case, the previously encrypted file will serve as input for decryption, and the output will be saved to a file named decryptedFile.
Get public key from persistent handle
The public key has to be transferred to the Cloud in order to encrypt the MQTT credentials e.g. via openssl.
It can be extracted using the following method:
|
1 |
tpm2_readpublic -c ${HANDLE} -o testkey.pub -f pem |
- ${HANDLE} represents the persistent handle (stored via tpm2_evictcontrol, see previous chapter)
The public key is stored in testkey.pub and has the following format:
|
1 2 3 4 5 6 7 8 9 |
-----BEGIN PUBLIC KEY----- MIIBIjANBgkqhkiG9w0BAQEFAAOCAQ8AMIIBCgKCAQEAsVkcoRJWeCRiAJrUSgUL O0a+s1Ye5S+hdqb7roxC+POEBRXp/nfbO8Hl2ImSf9G1//GaaO9D7uxB/gBzMwCU a09ijtGsAuDtBCi12TOAUXEpMlBlVMw0/VrSPQS2pZ3pdweX6ROWcScKRxdpZ9vB fI/bXgEgRQB2hyFG4QHavfpLXQ34+JcppSZmVg/QDYsAohfPKjLMMOfrdLKUG2BE vsUSH4Aa0Qydm3mo1XMp8qzgRkP+snnxFeZA78mHXKDLgrwwcLuoQnR1As6r6G35 bU0lmoCMYq0ZpzLl8eUoeN6uydQQH3fC2FUvi13hndDPsDfzA9d78y0f9uQuW2dZ LwIDAQAB -----END PUBLIC KEY----- |
In order to encrypt with openssl the command looks like the following:
|
1 |
openssl pkeyutl -encrypt -pubin -inkey testkey.pub -in secret.txt -out encryptedFile |
The MQTT credentials encrypted with OpenSSL can be decrypted directly on the device using tpm2_rsadecrypt. There is no need to utilize OpenSSL for the decryption process.
Summary
In this article, we explored how to utilize a TPM for securely storing a serial number in NV storage, ensuring its persistence through factory resets, system updates, and even complete storage flashes. We also discussed how to leverage a TPM to encrypt MQTT credentials for secure transmission between the device and the cloud, as well as the integration of a TPM into the Yocto environment.