
Notice:
This post is older than 5 years – the content might be outdated.
Previously, I gave a brief introduction to the core concepts and setup of Flutter. I showed the general structure of a Flutter project and some implementation examples for:
- Responsive UI
- In App Navigation
- Persistence (internal device storage)
The next step will be to build a prototype application in Flutter with Dart. As this is a longer procedure, I will split this project into at least two articles. This will reduce the code overload per article to a minimum and therefore will make the articles easier to follow and easier to understand. At the end of the article, you will find a link to the GitHub repository that contains the present stage of the application.
The App
I will follow the simple „analyze, design and implement“ pattern. This will help to avoid unnecessary drawbacks for unsupported features and provide us with a clear vision of the final application.
Step 0: Wording
- Pages: UI representations of a specific application state
- Widgets: Standard & custom widgets as per the Flutter Widget Catalog
- Navigation: Process of switching pages (In App routing)
Step 1: Analyse & Research
Let’s get started by defining what kind of Futter application we like to build. As shown in the diagram below, we are going to implement a simple general/detail app. This is a common structure and can easily be adjusted to various use cases.
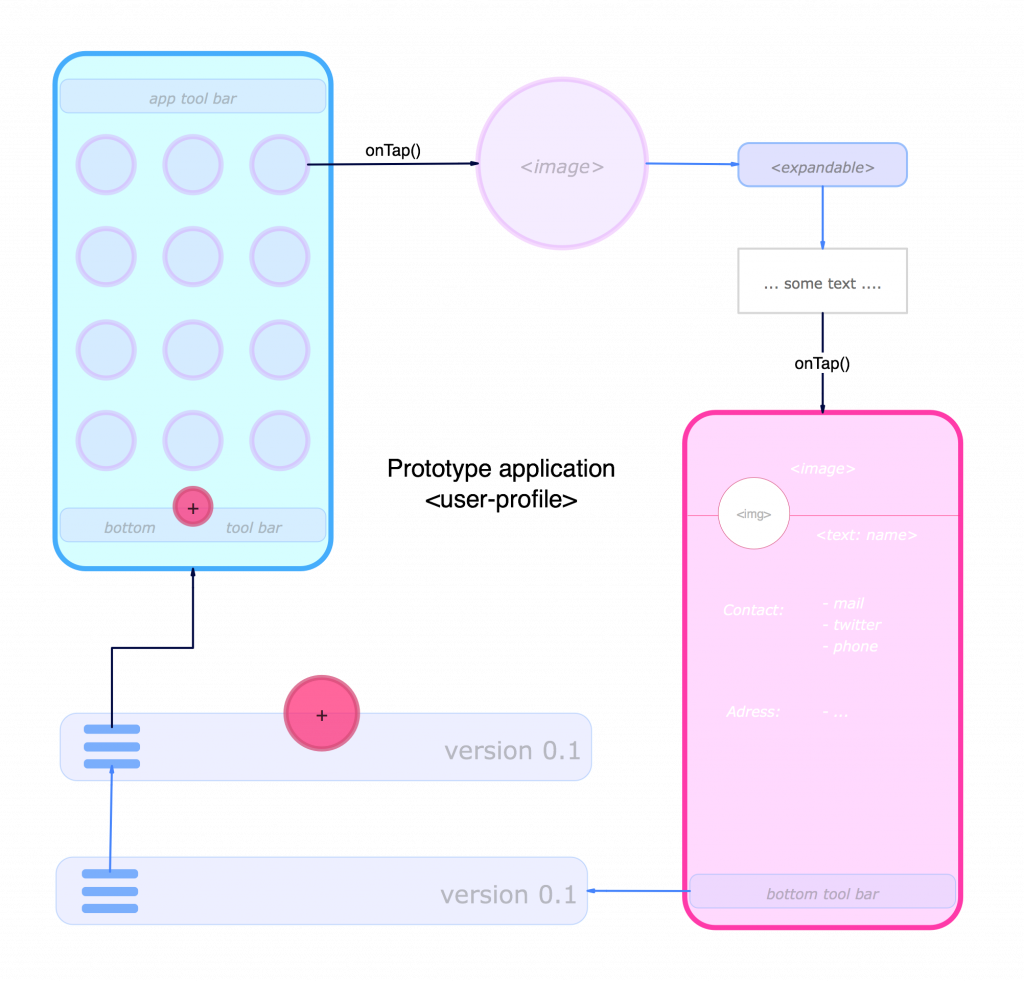
The given structure will be our guide to lean on during the implementation. We can use it to search for appropriate widgets and we can draw conclusions for the state management from it. This sounds complicated for starters like myself, but I will run you through the whole process and try to keep it as simple as possible.
Step 2: Design & Feature Definition
The basic structure of the app demands some specific setup, features and widgets.
| Design | Features | Widgets |
|---|---|---|
| 2 Pages (General / Detail) | Responsive Layout | Grid (catalog) |
| In App Routing | Custom Icon | Standard (catalog) |
| Assets (Images, Icons …) | Hero Animation | Custom (built by us) |
To keep this project simple, we will keep the the app theme as it is and only set different colors to the desired widgets. Therefore, we don’t need to create a full scale custom theme.
As I go through the implementation, I will introduce each required widget. I will start with the structure widgets and go through various kinds of other widgets, up to the standard widgets (Text or Buttons).
Design
The general page should show a grid of images that are loaded from the project’s assets directory, the image will be the interface of the details page which will contain functionality of a navigation between pages, while the expandable text widget, located below the image, is optional. Feel free to include it and share your experience in the comment section.
Each page should have a top app bar and a bottom app bar. In case we want to extend the project later, this would be the section where you set buttons. The overall look of the page can be derived from the basic structure diagram.
Features
The responsive layout will be achieved with the MediaQuery.of(…) function as described in the previous article. Custom widgets will be built as a combination of standard widgets. Heros are also included in that process. In the end, the custom icon is a standard task that will be accomplished with a third party library.
Step 3: Setup & Implementation
Select an IDE of your choice and follow the steps at the Flutter.io website in order to create your first project. Which IDE you use doesn’t matter because the project structure is the same for each.
We will start with the project setup and the import of all assets and libraries. Then, we will create our first widgets, the General widget and the DetailsPage widget.
Setup & Import
1. A new Flutter project has been created
The lib directory contains only the main.dart file.
2. Create an assets folder in the project’s root directory ()
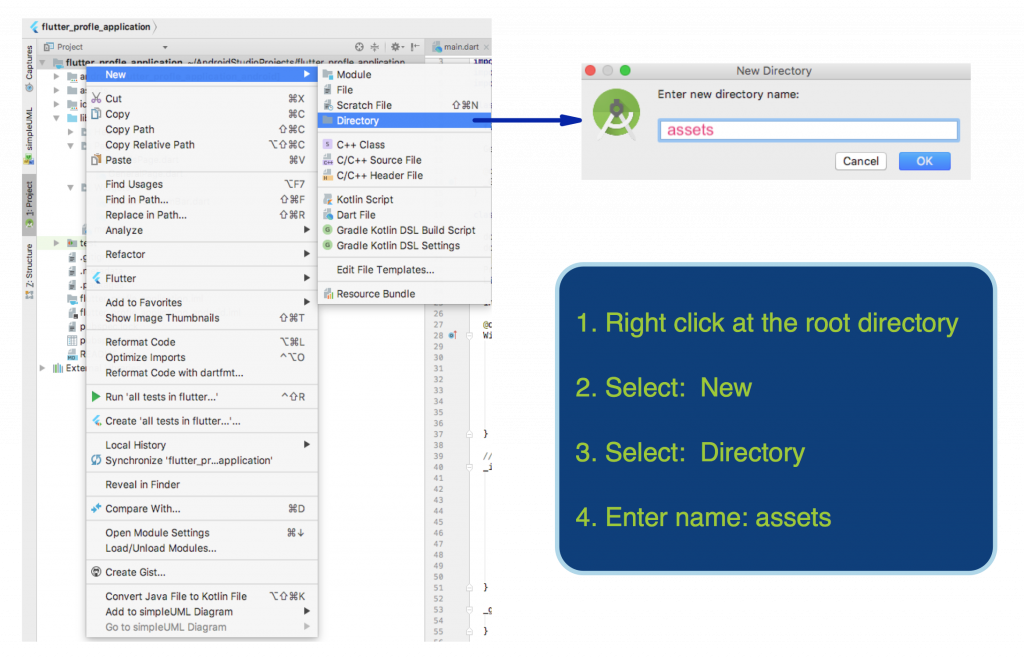
3. Add assets to the asset directory
Choose a bundle of images that you want to be displayed at the GeneralPage and paste them into the assets directory with right click and paste operation.
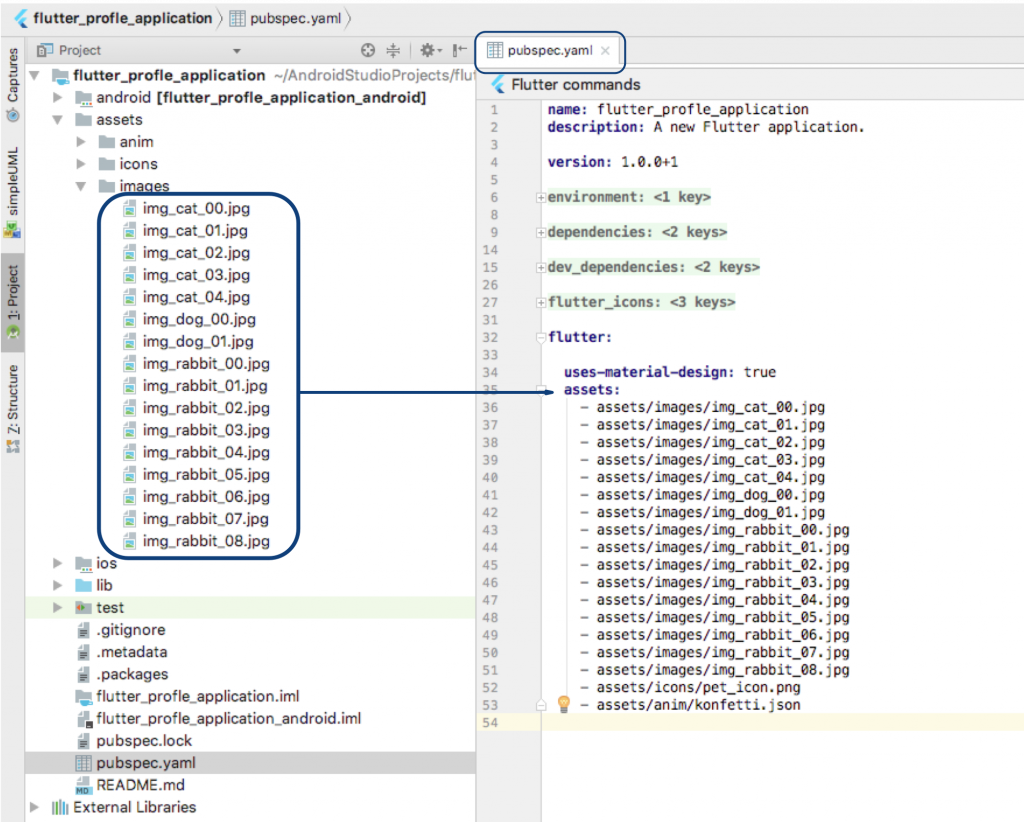
4. Add assets to the pubspec.yaml file
The pubspec.yaml file manages all assets, third party libraries, and the Flutter SDK setup. The assets have to be listed under the section flutter/assets and most importantly you have to follow the spacing convention as shown below.
5. Add third party library to the pubspec.yaml file
Find section dev_dependencies, add the package flutter_launcher_icons and the parameter flutter_icons as shown below. If you have chosen an image as your icon and imported it correctly, you can run the CL commands mentioned below in your project’s root directory. This will set the given image as the icon of your application.
|
1 2 3 4 5 6 7 8 9 10 11 12 13 14 15 16 17 18 19 20 21 22 23 24 25 26 27 28 29 30 31 |
... dev_dependencies: flutter_test: sdk: flutter # Special add custom icon # 1. add library # 2. add flutter_icons parameter # 3. add assets/icon/any_image_you_like # CLI run: flutter pub get # CLI run: flutter pub pub run flutter_launcher_icons:main flutter_launcher_icons: any flutter_icons: android: true ios: true image_path: "assets/icons/your_icon.png" .. |
Test your application with the CLI commands flutter packages get and flutter run to make sure that all packages have been imported correctly.
General & Details Page
The basic setup of the entire app is completed. Now we will have to design and connect widgets.
1. Create new Dart file GeneralPage.dart in lib directory
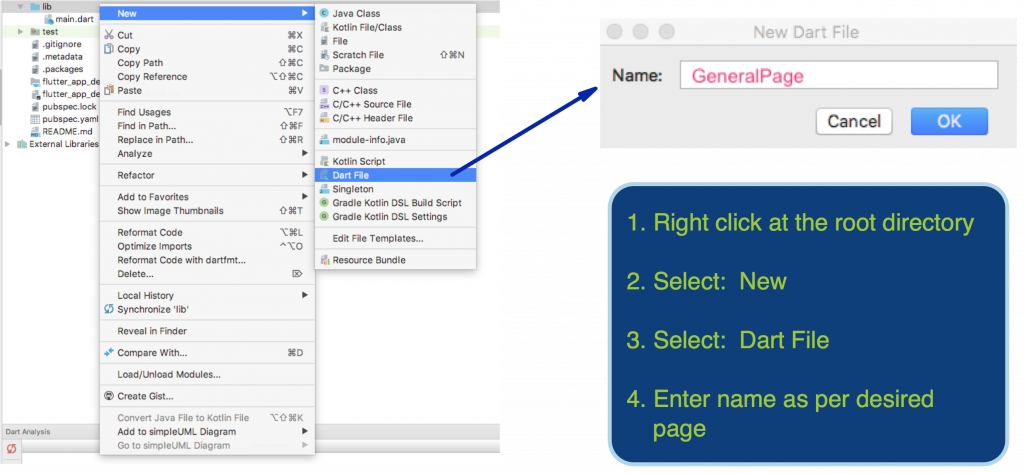
The Dart file will wrap the widget with the corresponding state in one file and can later be accessed via the Navigator.
2. Generate new Stateful Widget in GeneralPage.dart
Create a stateful widget, either as described in the official documentation or with the shortcut stful . stful will create the complete logic of a nameless stateful widget. Continue by setting the name of that widget to match the file name of the page.
HINT: Type stful to create the logic for a Stateful Widget.
|
1 2 3 4 5 6 7 8 9 10 11 12 13 14 15 16 17 18 19 20 21 22 23 |
// GeneralPage.dart class GeneralPage extends StatefulWidget { @override _GeneralPageState createState() => _GeneralPageState(); } class _GeneralPageState extends State @override Widget build(BuildContext context) { // Container is a placeholder at this moment return new Container(); } } |
3. Create new Dart file DetailsPage.dart in lib directory
Repeat step 1 and create a new Dart file called DetailsPage.
4. Generate new Stateful Widget in DetailsPage.dart
Repeat step 2 and create a new stateful widget called DetailsPage.
Each state widget of both pages returns a placeholder (new Container()). Besides this, the placeholder will be replaced with our custom widgets later. As soon as you have completed step 4, your lib directory should contain three Dart files:
- main.dart
- GeneralPage.dart
- DetailsPage.dart
Execute CLI command flutter run in the project root directory and check for compiling errors.
If your application runs without errors, you can proceed by implementing the core structure. Start with main.dart and define the structure in both page widgets.
main.dart
As we learned in the previous article, the main.dart file returns the root widget of the project. In the root widget we declare the home widget (the first widget to start) and other attributes like the title (this.title) of the app.
|
1 2 3 4 5 6 7 8 9 10 11 12 13 14 15 16 17 18 19 20 21 22 23 |
// main.dart void main() => runApp(new MyApp(); class MyApp extends StatelessWidget { String title = 'Profile' @override Widget build(BuildContext context) { return MaterialApp( // root widget title: this.title, home: GeneralPage(), ); } } |
GeneralPage.dart
As seen in the basic structure image, the GeneralPage widget serves as the home widget. The home attribute in the context of Flutter describes the first widget that will be built directly after the root widget. In order to get a predefined strutted app in Flutter we take advantage of a Scaffold widget.

This structural widget will be returned by the build function to the state widget (GeneralPageState) of the related page (GeneralPage).
|
1 2 3 4 5 6 7 8 9 10 11 12 13 14 15 16 17 18 19 20 21 22 23 24 25 26 27 |
// GeneralPage.dart class GeneralPage extends StatefulWidget { @override _GeneralPageState createState() => new _GeneralPageState(); } class _GeneralPageState extends State @override Widget build(BuildContext context) { return Scaffold appBar: new AppBar(), body: new Container(), bottomNavigationBar: new Container(), ); } |
The Scaffold widget has many attributes, but for this project I will only use the appBar, the body and the bottomNavigationBar. All of these attributes will be addressed with the next part of this article series. For now I recommend to set a placeholder (new Container()).
DetailsPage.dart
The implementation of the DetailsPage widget is equal to the GeneralPage widget. Continue with the exchange of the new Container() placeholder, in the _DetailsPageState class, with the defined Scaffold widget. Both pages should now contain an equal implementation of a Scaffold widget in the related state class.
Recap
We have started to create our first Flutter application. It consists of two pages, the General– and the DetailsPage. All necessary assets and third party packages are imported in the pubspec.yaml file. Furthermore, an additional assets directory has been added to the root project directory. The assets directory should contain images to populate other widgets at a later stage of this project. The course is set for the next steps:
- Create Custom UI Widgets
- Add UI for GeneralPage and DetailsPage
- Implement In App Navigation
- Run Hero Animation
In the next article: „Flutter: The Finalizer! (Part 4)“, I will finalize the prototype profile app. Feel free to have a look at the Github Repository and share your opinion!
All articles in this series
- Flutter: The Beginning of a New Era? (Part 1)
- Flutter: New Concepts? (Part 2)
- Flutter: The Finalizer (Part 4)
Read on
Find out more about our Android and iOS portfolio or join us as a mobile developer!


3 Kommentare